Step 1. Get the script and voice recording signed off before you lock down the animation
You’re an animator, the visuals are your baby, and by all means you need to storyboard it to sell the concept and quote accurately for the work involved. But before you jump right in and start animating, get the client to sign off on the script. Sure, they might agree to a two minute animation and love what you’ve created for them, but if they then draft out three minutes of text that they won’t compromise on, you’ll be stuck.
If the client wants you to begin work on the animation as a proof of concept before you have your professional voiceover, perhaps you can record a guide track yourself to help gauge the animation timings? We'd suggest aiming for a pace of 150 words per minute for a corporate animation.
However, ideally, get the script signed off and the UK voiceover recorded first.
It’s handy to record just the UK voiceover first to establish the tone of voice the client likes. Once they’re happy with the English recording you can use that as a style guide for the other languages.
At this stage your client might ask to see the completed animation with the UK voice*.
We’ll cover how to go about that shortly but our suggestion on the next step would be…
Step 2. Translate before you animate
Before you go ahead and lock down the visuals you’ve got to be mindful of a couple of things. Not all languages use the same number of words to say the same things. Equally important is that not all languages are spoken at the same pace. If you can translate and record all the voiceovers before you finalise the animation you’ll be able to quantify the longest duration for each scene on your storyboard, across all languages, so when you complete the animation you can ensure you allow enough time for each scene to cover all localisations.
*If your client asks you to create the animation with the UK voiceover before you record the other languages, you can include extra gaps between sentences when you animate for the English language in order to compensate for that potential “bloating” caused by translation.
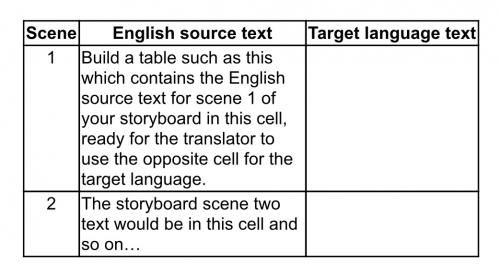
Step 3. Prepare for translation
When you instruct translators to work through your text it’s helpful to explain that this will be used for a dubbing and where possible they may need to paraphrase sentences to help keep the duration of the speech in the target language as close as possible to the source language.
Step 4. Get sign off on your translations before your record the localisations
This step is just as important in any language as your initial script sign off! The client you’re working for may have brand language that they prefer to use for each target language so it’s common for there to be tweaks after translation. Give your client the opportunity to drop in these familiar phrases before we record the voiceovers as it can save you a headache down the line.
Check with your client whether brand names are pronounced the same in every language. The same question with acronyms such as “LED”; does each language speak the letters of the acronym or speak it as a word? If they speak the acronym as letters do they use the English pronunciation or native pronunciation of those letters?
Step 5. Create the animation
You’re almost there!
When animating for localisations there are a couple of additional considerations so keep these points in mind.
You may want to drop in visual cues to enhance engagement with your audience but don’t make life difficult for yourself. Use images rather than words and you’ll save yourself having to re-animate each of those cues for every language.
Another aspect to consider is that word order won’t necessarily be the same in each language. For example in German you’re likely to find the verbs won’t mirror the same position in the sentence as in English. Your visual cues might have to remain on screen a touch longer than usual to allow time for each language to hit them. Finally, your moment to shine and create the animation.
Just remember these steps:
Questions: So how do you create a localised animation with voiceover?
Answer: Just remember these top 5 tips!
· Get the script and voiceover signed off before you lock down the animation
· Translate before you animate
· Prepare for translation
· Get sign off on your translations before you record the localisations
· Create the animation
Looking for voices for your next localisation project?
We record native voice artists in over 40 languages so please pick up the phone and call +44 (0)20 7099 2264 or click the link below and drop us an email.
(Updated March 2021)